How to root an orchid?
Last reviewed: 14.03.2025
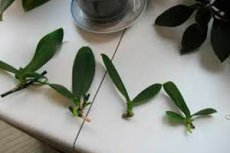
Rooting an orchid can be both a rewarding and challenging task, especially for those who are just starting to grow orchids. Whether you want to root an orchid at home or are trying to understand how to root an orchid without roots, this guide will provide you with detailed instructions and useful tips for any situation. Here, we will discuss how to root an orchid in different conditions, including using leaves, keikis, and even flower spikes.
How to root an orchid at home?
Rooting an orchid at home can be done in different ways, depending on the current condition of the plant. How to root an orchid at home largely depends on whether the orchid has existing roots, is a leaf cutting, or a keiki (a small plant that grows from the mother plant). Regardless of the situation, the key to success is to create an environment that closely resembles the orchid's natural habitat, which means providing adequate humidity, light, and ventilation.
One common approach for rooting an orchid at home is to use sphagnum moss. Place the base of the orchid or the cut part in damp (not wet) sphagnum moss, ensuring it receives bright but diffused light. The moss retains the moisture needed for new roots to form while allowing sufficient air circulation.
How to root an orchid without roots?
Reviving an orchid without roots is a challenging but achievable task if the correct methods and conditions are followed. Here is a step-by-step guide:
1. Preparing the orchid
- Examine the plant:
Ensure the leaves are healthy (not completely wilted), and the stem is not damaged. - Remove damaged parts:
Cut off all rotten, dried, or damaged root sections using sharp and sterilized tools.
Treat the cuts with powdered charcoal, cinnamon, or a fungicide to prevent infections.
2. Choosing a rooting method
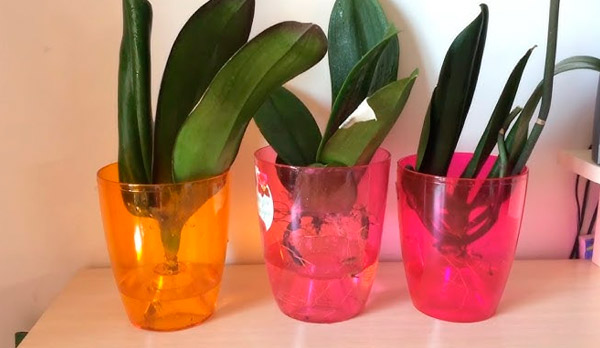
Method 1: water rooting
- How to do it:
- Place the base of the orchid in a container so that it does not touch the water.
- Keep the water level 1–2 cm below the base of the plant.
- Every 1–2 days, lift the orchid out for 20–30 minutes to allow it to "breathe."
- Advantages:
- Creates a humid environment to stimulate root growth.
- Disadvantages:
- High risk of rot if the base comes into contact with water.
Method 2: using sphagnum moss
- How to do it:
- Moisten sphagnum moss and squeeze out excess water.
- Place the orchid so its base slightly touches the moss.
- Cover the plant with a clear container or plastic bag to create a greenhouse effect.
- Advantages:
- Maintains constant humidity and good aeration.
- Disadvantages:
- Risk of overwatering.
Method 3: humidity chamber
- How to do it:
- Place the plant in a container with high humidity (70–90%) and a temperature of +22–28°c.
- Ensure the orchid does not touch wet surfaces.
- Advantages:
- Provides an ideal environment for root formation.
- Disadvantages:
- Requires constant monitoring of temperature and humidity.
Method 4: hydroponics
- How to do it:
- Place the orchid in a container with water, submerging the base by 1–2 cm.
- Add an aerator to oxygenate the water.
- Advantages:
- Speeds up root formation.
- Disadvantages:
- Requires special equipment.
3. Conditions for rooting
- Lighting:
Bright but diffused light without direct sunlight. Provide 12–14 hours of light daily. - Temperature:
Optimal rooting temperature is +22–28°c. - Humidity:
High humidity (60–80%) is crucial. Use humidifiers or a tray with moist pebbles. - Root growth stimulants:
Soak the base of the orchid in a rooting stimulant solution (e.g., "kornevin" or succinic acid) for 15–30 minutes before starting the rooting process.
4. Caring for the orchid during rooting
- Ventilation:
If the plant is in an enclosed environment (humidity chamber, bag), ventilate it daily for 10–15 minutes. - Watering:
Moderate watering is essential. Avoid waterlogging to prevent rot. - Monitoring health:
Regularly check for signs of mold or rot. If issues arise, remove damaged areas and treat them with a fungicide.
5. When to expect results
- Initial root formation:
Roots may begin to appear within 2–4 weeks. - Full root system development:
Usually takes 1–2 months.
6. Transplanting after rooting
Once the roots reach 3–5 cm in length:
- Transplant the orchid into a substrate of medium or large bark.
- Water using the soaking method, allowing the substrate to dry out between waterings.
- Continue providing high humidity and bright light.
Common mistakes when rooting
- Overwatering:
Leads to rot at the base. - Insufficient light:
Slows down root growth. - Dense substrate:
Restricts airflow, hindering root development.
How to root an orchid leaf?
Rooting an orchid leaf is a challenging task since most orchid species cannot produce roots from a single leaf. However, it is possible to attempt rooting if the leaf includes a node (bud), which can potentially develop roots and shoots. This process is more likely to succeed with orchid types like vanda or dendrobium, where leaves may retain a growth point.
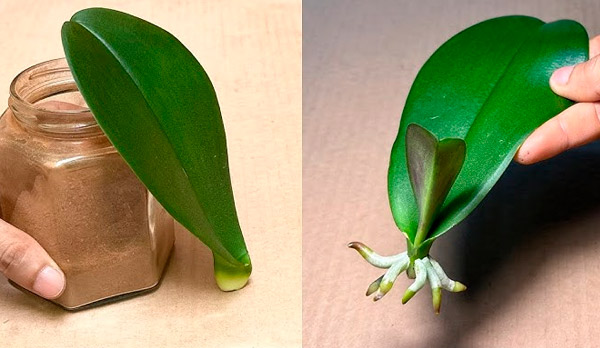
Conditions for rooting an orchid leaf
- Presence of a node or bud: if the leaf is taken with a portion of the stem containing a node, the chances of rooting are higher.
- Healthy leaf: the leaf should be green, firm, and free of damage, rot, or spots.
- Growth hormones: using hormones such as auxins can stimulate root formation.
- Suitable substrate: use sphagnum moss, a mix of bark and perlite, or moist sand as the rooting medium
Step-by-step process to root an orchid leaf
1. Preparing the leaf
- If the leaf has a node, treat the cut area with activated charcoal, cinnamon, or a fungicide to prevent rot.
- Soak the leaf in a root growth stimulator (e.g., "kornevin" or succinic acid) for 15–30 minutes.
2. Choosing the substrate
- Prepare sphagnum moss or a mix of bark, perlite, and sand.
- Sterilize the substrate by pouring boiling water over it or treating it with a fungicide solution.
3. Planting the leaf
- Place the leaf vertically or at an angle so that the node is in contact with the substrate.
- Ensure the leaf is secured in place to prevent movement.
4. Creating a mini-greenhouse
- Put the pot with the leaf into a transparent container or cover it with a plastic bag to create a greenhouse effect.
- Maintain a temperature of +22 to +28°c and humidity of 70–80%.
5. Caring for the leaf during rooting
- Ventilate the greenhouse regularly to prevent mold growth.
- Mist the substrate and leaf with warm water or a growth stimulator solution, avoiding overwatering.
- Provide diffused light while avoiding direct sunlight.
Stimulating root growth
- Rooting hormones: use "kornevin," "zircon," "epin," or succinic acid to treat the cut area and water the substrate.
- Succinic acid:
- Dissolve 1 tablet in 1 liter of water.
- Water the substrate or spray the node every 10–14 days.
Timeline for rooting
- Rooting can take several weeks to several months.
- If no roots form within 2–3 months, the leaf likely cannot root.
Alternative rooting method
- In water: submerge the bottom of the leaf with the node in warm water mixed with a root growth stimulator.
- Change the water every 2–3 days and monitor the node's condition.
When rooting is not possible?
- No node present: a leaf without a node cannot develop roots.
- Damaged or old leaf: such leaves are incapable of rooting.
- Unsuitable orchid type: some types, like phalaenopsis, cannot root from a single leaf.
How to root orchid keikis?
Orchid keikis (baby plants) are small offshoots that form on the flower spike, root system, or stems of the parent orchid. Rooting keikis requires the right conditions to ensure they develop strong roots and grow independently.
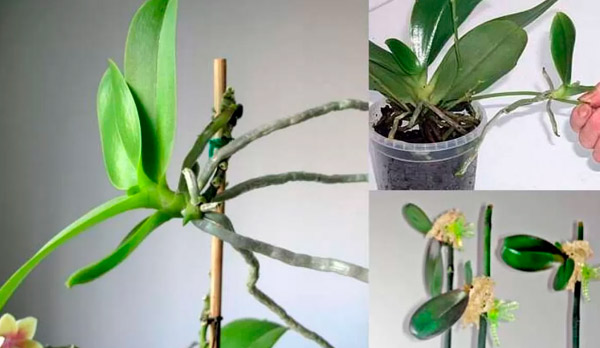
When to separate a keiki?
A keiki can be separated from the mother plant when it meets the following conditions:
- Roots are 3–5 cm long: this ensures the keiki can absorb water and nutrients effectively.
- 2–3 leaves are present: leaves indicate the keiki's ability to photosynthesize.
- Healthy appearance: the keiki should be green, firm, and free of signs of disease or damage.
How to separate a keiki?
- Sterilize your tools:
- Use a sharp knife, pruning shears, or scissors.
- Disinfect the tool with alcohol or flame to avoid infection.
- Cut the keiki:
- Cut with a small portion of the mother plant’s tissue to avoid damaging the keiki’s base.
- Leave 1–2 cm of the stem from the parent plant.
- Treat the cut areas:
- Apply powdered activated charcoal, cinnamon, or fungicide to the cut areas to prevent rot.
Preparing the substrate for rooting
The best substrates for rooting keikis include:
- Sphagnum moss: ideal for keikis with short roots because it retains moisture well.
- Pine bark: suitable for keikis with more developed roots.
- Blend: a mix of sphagnum moss and bark (1:1) for balanced moisture and aeration.
Rooting process
- Soak the substrate:
- Soak sphagnum moss or bark in warm water for 20–30 minutes to hydrate it.
- Plant the keiki:
- Carefully place the keiki's roots in the substrate without burying it too deeply.
- The keiki's base should be slightly above the substrate.
- Create a mini greenhouse:
- Cover the pot with a clear plastic bag or place it in a container with a lid to create a humid environment.
- Ensure ventilation holes are present to prevent mold.
Conditions for rooting keikis
- Temperature: maintain a warm environment of +22 to +28°c (72–82°f).
- Humidity: keep humidity levels at 60–80%. Regularly mist the moss or substrate.
- Light: provide bright, indirect light, avoiding direct sunlight.
- Watering: water as the substrate dries out, avoiding water stagnation.
- Growth stimulants: use rooting hormones like "kornevin," "zircon," or succinic acid to encourage root development.
What to do if the keiki has no roots?
If the keiki hasn’t formed roots, try these methods:
- On sphagnum moss:
- Place the keiki on moist sphagnum moss and mist regularly with warm water or a growth stimulant solution.
- In water:
- Suspend the keiki so its base just touches the water.
- Add a few drops of rooting hormone to the water.
- Warm, humid chamber:
- Place the keiki on damp moss in a container, creating a greenhouse effect to stimulate root growth.
Care for rooted keikis
Once the keiki has rooted, ensure proper care:
- Transplant it into an appropriate orchid pot with a specialized substrate.
- Fertilize with a diluted orchid fertilizer every 2–3 weeks.
- Provide consistent lighting and temperature conditions.
Common mistakes
- Separating the keiki too early: without roots, the keiki is unlikely to survive.
- Overwatering: this can lead to rot.
- Improper lighting: too much or too little light can slow root development.
- Neglecting sterilization: using unclean tools increases the risk of infection.
By following these steps, you can successfully root orchid keikis and enjoy watching them grow and bloom!
How to root an orchid from a flower spike
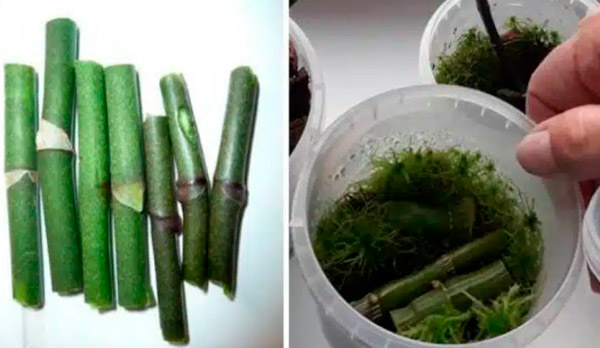
Rooting an orchid from a flower spike is a challenging but possible process that requires patience and specific conditions. This method is primarily used for phalaenopsis orchids, which sometimes produce new plants (keikis) from nodes on the flower spike.
When is rooting from a flower spike possible?
Rooting from a flower spike is possible if:
- The spike remains green and healthy after the flowers fade.
- There are dormant buds (nodes) on the spike that can be activated to grow into new plants.
Preparing the flower spike for rooting
- Trimming the flower spike:
- Trim the flower spike after it finishes blooming.
- Ensure the spike is green and viable.
- Divide the spike into segments approximately 10–15 cm long, with one dormant bud on each segment.
- Treating the cuts:
- Sterilize the cuts using activated charcoal, cinnamon, or a fungicide to prevent infections.
- Carefully remove the protective bracts covering the nodes using a knife or toothpick.
- Activating the buds:
- Apply a cytokinin paste (a bud growth stimulant) to the dormant bud.
- Repeat the application every 7–10 days.
Methods for rooting the flower spike
Moist environment method
- Substrate:
- Prepare moist sphagnum moss.
- Place the flower spike segment horizontally on the moss.
- Mini-greenhouse:
- Place the spike in a transparent container or cover it with a plastic bag to create high humidity (60–80%).
- Temperature and light:
- Maintain a temperature of +22 to +25°c.
- Provide bright, indirect light.
- Moisture maintenance:
- Regularly mist the moss with warm water to keep it moist but not waterlogged.
Water method
- Preparation:
- Place the cut flower spike in a container with warm water, ensuring the base is submerged.
- Adding rooting agents:
- Add a few drops of a rooting stimulant like "kornevin," "zircon," or succinic acid.
- Water changes:
- Replace the water every 2–3 days to prevent rot.
- Heat and light:
- Ensure a warm environment and bright light without direct sunlight.
Caring for emerging keikis
- Root development:
- Once the keiki develops roots that are 3–5 cm long, it can be transplanted into a separate pot.
- Substrate:
- Use a mix of sphagnum moss and fine-grade bark.
- Watering:
- Water the moss when it starts to dry out, avoiding overwatering.
- Fertilization:
- After a month, begin feeding the plant with a diluted orchid fertilizer.
Common mistakes in rooting
- Dry environment: lack of humidity can cause the buds to fail.
- No stimulants: without cytokinin paste, dormant buds are unlikely to activate.
- Overwatering: excessive moisture can lead to rot.
Rooting an orchid in water
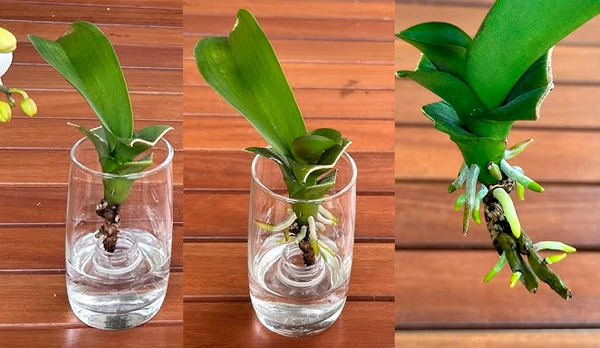
Rooting an orchid in water is a method used to rehabilitate a plant that has lost its roots or to encourage root growth in keikis or cuttings. This approach can be effective when specific conditions, such as proper temperature, lighting, and consistent care, are maintained.
When to use the water rooting method
This method is suitable for:
- Orchids without roots that need recovery.
- Orchid keikis with underdeveloped roots.
- Cuttings, especially when substrate is unavailable.
Steps for rooting an orchid in water
1. Prepare the orchid
- Inspect the plant:
- Remove any rotting, dried, or damaged roots and leaves.
- Treat the cuts with crushed charcoal, cinnamon, or fungicide to prevent rot.
- Select a suitable part:
- Use a healthy keiki, cutting, or rootless orchid for the process.
2. Prepare the water
- Water quality:
- Use soft water: filtered, boiled, or rainwater.
- The water temperature should be around +25…+30°c.
- Add rooting stimulants:
- Enhance the water with rooting agents like "kornevin," "zircon," or succinic acid (1 tablet per 1 liter of water) to accelerate root growth.
3. Position the orchid in the water
- Suspension method:
- Place the orchid so that its base is just above the water without touching it. This creates a humid environment to stimulate root growth.
- Partial submersion method:
- Immerse the orchid base in water up to 1 cm, ensuring it doesn't become overly wet to avoid rot.
- Daily aeration:
- Remove the orchid from the water for 6–12 hours daily to prevent rotting.
4. Optimal growing conditions
- Lighting:
- Provide bright, indirect light for 12–14 hours daily, avoiding direct sunlight.
- Temperature:
- Maintain an air temperature of +22…+28°c.
- Change the water:
- Replace the water every 2–3 days to prevent bacterial growth.
When will roots appear?
- Initial root growth may be visible within 2–4 weeks.
- Fully developed roots, 3–5 cm long, usually appear in 1–2 months. At this stage, the orchid can be transplanted into the substrate.
Transplanting into substrate
- Prepare the substrate:
- Use medium-grade bark, sphagnum moss, and perlite.
- Planting:
- Place the orchid in a pot with the substrate, ensuring the roots are partially covered.
- Watering:
- Avoid watering the orchid for the first 7–10 days to allow the cuts to heal. Then begin misting lightly.
Common mistakes in rooting orchids in water
- Full submersion: submerging the entire plant can cause rot.
- Cold water: reduces the likelihood of successful rooting.
- Infrequent water changes: leads to bacterial and fungal infections.
How to root orchid offshoots and cuttings?
Rooting orchid offshoots or cuttings is another viable method of propagation. The steps for Rooting an orchid cuttingAre similar to those for rooting keikis or flower spike sections. Keep the cuttings in a moist environment with high humidity, using sphagnum moss or bark.
For rooting an orchid offshoot without roots, it's important to maintain a stable environment with adequate light, warmth, and humidity. This will encourage root development and ensure the young plant thrives.
Conclusion
How to root an orchid depends on the propagation method and the condition of the plant. Whether you are dealing with rooting an orchid without roots, rooting a leaf, or rooting a keiki, the key is to create the right environment — one that closely replicates the natural conditions of an orchid's habitat. High humidity, sufficient warmth, and good air circulation are critical factors for success.
Rooting an orchid may take time and patience, but with consistent care, you can successfully propagate these beautiful plants, allowing them to continue flourishing. Whether you're trying to root an orchid at home or learning how to root an orchid in water, following these detailed steps will give you the best chance of success and help your orchids thrive.
