How to grow an orchid keiki?
Last reviewed: 29.06.2025

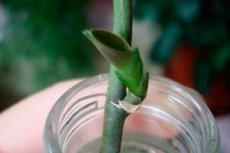
Growing orchid keikis is one of the most fascinating aspects of caring for these exotic plants. A keiki, which means "child" in hawaiian, can grow on an orchid spike or from other parts of the plant. In this article, we will explain how to grow an orchid keiki at home, explore ways to stimulate keiki growth on a flower spike, and provide detailed care instructions for orchid keikis.
How to grow an orchid keiki on a flower spike?
How to grow a keiki on an orchid spike is one of the most frequently asked questions among orchid enthusiasts. Small plantlets, called keikis, can appear on the flower spike of an orchid, which can later be separated and grown as individual orchids. To achieve this, it's important to provide the right conditions:
- Temperature regimen: to grow a keiki on an orchid spike, create a temperature difference between day and night. The daytime temperature should be around 24-28°c, and the nighttime temperature should be 5-10° lower. This stimulates the plant to produce new offshoots.
- Humidity and lighting: the humidity level in the room should be maintained at 60-70%, and the lighting should be bright but diffused. A lack of light can prevent the formation of keikis.
- Stimulation with keiki paste: there is a special paste for stimulating keiki formation on the spike—cytokinin paste. Apply a small amount of the paste to a dormant node on the flower spike to stimulate keiki growth. How to properly grow an orchid keiki using the paste? It's important not to overdo it and use only a small amount of the product.

How to grow an orchid keiki on a cut flower spike?
If the orchid's flower spike has been cut, it doesn't mean it's useless. How to grow an orchid keiki on a cut flower spike?
- Preparing the flower spike: cut the flower spike just above a dormant node and place it in a container with water. You can slightly fertilize the water with a special orchid fertilizer to improve the chances of keiki formation.
- Conditions for growth: the flower spike should be kept in a warm and bright place, preferably in a mini greenhouse to maintain high humidity.
How to grow orchid keikis at home?
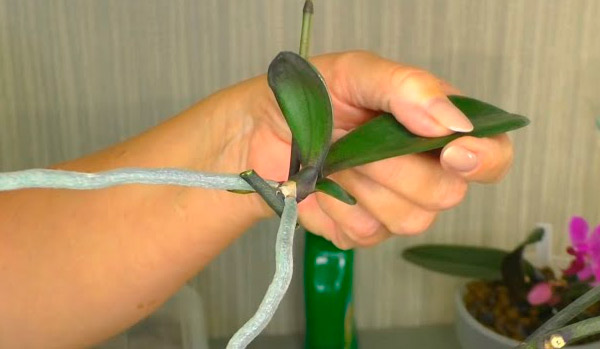
Growing orchid keikis (baby plants) at home is an exciting process that requires care and attention. Keikis are young plants that appear on the flower spike, stem base, or root system of an orchid. Here is a step-by-step guide to successfully grow them:
1. Choosing the right time
The best time to grow keikis is in spring or summer when the orchid is in its active growth phase. Longer daylight hours and optimal temperature and humidity conditions make this period ideal.
2. Determining the keiki’s readiness
Keikis can be separated from the mother plant only after they develop:
- 2–3 roots that are 3–5 cm (1–2 inches) long;
- 2–4 leaves.
If the roots are still short or absent, the keiki is not ready for separation
3. Preparing tools
For separating keikis, you will need:
- A sharp knife or pruner disinfected with alcohol;
- Charcoal powder or cinnamon powder for treating cuts;
- Orchid substrate (pine bark, sphagnum moss).
4. Separating the keiki
- Carefully cut the keiki, leaving a small piece of the flower spike or root where it grew.
- Treat the cuts on both the mother plant and the keiki with charcoal powder or cinnamon to prevent infection.
5. Planting the keiki
- Prepare a small transparent pot with ventilation and drainage holes.
- Fill the pot with orchid substrate.
- Gently place the keiki in the center of the pot, lightly covering the roots with the substrate but not burying the base of the plant.
- For keikis with short roots, use moist sphagnum moss to encourage root growth.
6. Creating optimal growth conditions
- Temperature: maintain a temperature of 22–25°c (72–77°f).
- Humidity: 60–80%. Use a humidifier or place the pot on a tray with water and pebbles.
- Lighting: provide bright, indirect light while avoiding direct sunlight. East- or west-facing windows are ideal.
- Watering: water only after the substrate has dried completely to prevent root rot
7. Encouraging root development
To speed up root growth, you can:
- Use root stimulators (e.g., "kornevin" or "epin");
- Regularly mist the keiki with water mixed with a small amount of root stimulator.
8. Caring for the growing keiki
- Regularly inspect the plant for signs of disease or pests.
- Gradually increase the intervals between watering as the plant matures.
- Once new roots and leaves have formed, transfer the keiki to a larger pot.
9. Waiting for flowering
Keikis usually start blooming 1–2 years after separation. This depends on care conditions and the plant’s overall health.
Tips for successful cultivation
- Don’t separate the keiki too early to ensure it has enough resources to survive independently.
- Create greenhouse-like conditions (cover the pot with a plastic lid with ventilation holes) to maintain high humidity and stable temperatures.
- Be patient: root and leaf development in keikis is slow.
How to grow roots on an orchid keiki?
Once a keiki appears on the flower spike, it's important to focus on developing its roots. How to grow roots on an orchid keiki?
- Moistening: regularly mist the root zone of the keiki to stimulate root development. Use soft, settled water.
- Using sphagnum moss: wrap the base of the keiki with moist sphagnum moss to stimulate root growth. Moss helps maintain the proper level of humidity around the keiki.
- Patience: keiki roots may take several weeks or even months to develop. It's important not to detach the keiki from the mother plant until it has at least 3-4 roots that are 3-5 cm long.
How to grow an orchid keiki in a bottle?
One of the unusual methods is growing an orchid keiki in a bottle. This creates greenhouse-like conditions and helps the keiki develop a root system more quickly.
- Preparing the bottle: take a plastic bottle and cut it in half. Place moist sphagnum moss in the bottom half and place the keiki or flower spike with a node inside.
- Creating a greenhouse effect: cover it with the top part of the bottle to create a mini greenhouse. Ventilate the structure regularly to prevent mold growth.
How to grow an orchid keiki on a stub?
Growing an orchid keiki on a log is an interesting and creative method that mimics the natural conditions of orchid growth. This approach is suitable for epiphytic orchids like phalaenopsis. Here is a step-by-step guide:
1. Choosing the right log
- Use logs made from durable wood, such as oak, pine, or mangrove. These types are resistant to rot and maintain their structure for a long time.
- The log should be cleaned of loose or damaged bark and treated to eliminate pathogens (e.g., by boiling or pouring boiling water over it).
2. Preparing the orchid
- Identify an orchid with a keiki growing on the flower spike or at the base of the mother plant.
- Ensure the keiki has 2–3 roots at least 3–5 cm (1–2 inches) long and several leaves. If the roots are still short, root stimulation may help.
3. Attaching the keiki to the log
- Moistening the log: soak the log in water for several hours before starting to ensure it retains moisture.
- Securing the keiki:
- Use sphagnum moss to wrap around the keiki’s roots. This retains moisture and creates a suitable growing environment.
- Secure the keiki to the log with nylon thread, soft wire, or special orchid ties. Avoid tying it too tightly to prevent damaging the roots.
- Positioning: place the keiki so its base touches the log but is not deeply buried in the moss.
4. Creating optimal growing conditions
- Humidity: maintain a high humidity level (60–80%). You can use a humidifier or create a greenhouse effect by covering the log with a transparent dome with ventilation holes.
- Temperature: the optimal temperature range is 22–25°c (72–77°f).
- Lighting: provide bright, indirect light. Avoid direct sunlight, which can dry out the plant.
- Watering: mist the moss and log 1–2 times a day to maintain consistent moisture levels, but avoid water stagnation.
5. Encouraging root growth
If root development is slow, use growth stimulators (e.g., "kornevin" or "epin") to treat the roots before attaching the keiki to the log or adding the stimulator to the misting water.
6. Caring for the growing keiki
- Regularly check the condition of the moss and log to ensure they do not dry out. Replace the moss if it begins to decompose.
- Gradually increase intervals between misting as the roots lengthen and strengthen.
7. Transferring the keiki to a new substrate (optional)
Once the keiki's roots are well-developed (5–7 cm long), you can leave it on the log or transplant it into a pot with orchid substrate.
Benefits of growing on a log
- Creates a natural, decorative composition that resembles the orchid's natural habitat.
- Roots receive excellent air circulation, reducing the risk of rot.
- Easy watering and maintenance.
Important tips
- Monitor humidity: the log and moss should remain consistently moist but not overly wet. Overwatering can lead to rot.
- Regular inspections: check the keiki and log for mold or pests.
- Be patient: root and leaf growth on a log may be slow, especially in the first few months.
How to properly grow orchid keikis: key tips
- Do not rush to separate the keiki: how to properly grow an orchid keiki? The keiki should remain on the mother plant until it has developed its own roots. This will give it the best chance of survival.
- Maintain humidity: high humidity is key to successfully growing keikis. Use a humidifier or create a mini greenhouse.
- Gradual adaptation: after separating the keiki from the mother plant, it should be gradually adapted to room conditions. First, keep it in high humidity conditions, then gradually lower it to the normal level.
Conclusion
Growing orchid keikis is an interesting and rewarding process that not only allows you to propagate your plant but also helps you better understand its growth characteristics. Whether you're growing a keiki on an orchid spike or on a cut flower spike, it's important to remember patience and the proper conditions. By following the recommendations on how to grow orchid keikis at home, you can successfully propagate your orchids and enjoy their beauty even more.
