Repotting orchids
Last reviewed: 29.06.2025

Orchids are among the most beautiful and exotic flowers that can be grown at home. Their stunning shapes and bright colors make them a wonderful decoration for any interior. Despite their reputation for being finicky, orchids can delight the eye for many years if you know the basic care rules. In this article, we will discuss in detail how to properly care for orchids at home.
1. Choosing the right place
Orchids prefer bright but diffused light. Direct sunlight can damage delicate leaves, causing burns. Ideally, place the orchid on an east or west windowsill, where the plant will receive morning or evening sun. If you only have a south-facing window, use a light curtain to protect the orchid from harsh rays.
Temperature is also important: during the day, orchids are comfortable at temperatures of 20-25°C, while at night, they prefer 15-18°C. Temperature fluctuations stimulate flowering, so it is important to ensure a difference between day and night temperatures.
2. Repotting orchids: a detailed guide
Repotting orchids is an essential aspect of orchid care that helps maintain the health of their roots and overall condition. In this guide, we will cover the most important aspects of repotting orchids, focusing on dealing with different types of roots, including healthy, rotten, aerial, and large roots.
When and why to repot orchids
Orchid roots are crucial for the plant's health, and repotting is necessary when the roots outgrow their pot or when the substrate loses its properties. Repotting should be done every 2-3 years or when the plant shows signs of distress, such as roots rotting or growing extensively outside the pot. Orchids may also need repotting when the medium breaks down, becoming compacted, which leads to poor aeration.
Repotting is best done in spring or after the flowering period. This timing allows the orchid to recover more quickly and adapt to its new environment.
Step-by-Step orchid repotting process
1. Preparing for repotting
Before starting, gather the necessary supplies:
- New pot with drainage holes (transparent pots are preferred to observe root health).
- Orchid-specific potting mix (usually a combination of bark, charcoal, and sphagnum moss).
- Sterilized scissors or pruning shears.
- Disinfectant or fungicide for treating cut roots.
2. Removing the orchid from the pot
Gently remove the orchid from its current pot. If the roots are stuck to the pot or the medium, gently squeeze the sides of the pot to loosen them. Be careful not to break the roots, as they can be fragile.
3. Handling roots during repotting
Orchid root health check: Inspect the roots carefully. Healthy orchid roots should be firm, green, or silvery in color. Rotten roots will appear brown, mushy, and have an unpleasant odor.
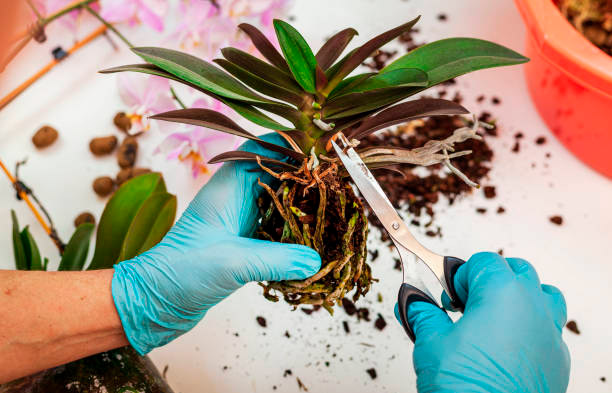
- Cutting rotten roots: Use sterilized scissors to remove any rotten or dead roots. These roots will feel soft or hollow and must be removed to prevent further decay.
- Processing large roots: During the repotting of orchids with large roots, it is essential to give them enough space in the new pot. The roots should fit comfortably without being crowded.
- Handling aerial roots: Orchids often have aerial roots growing outside the pot. During repotting, these can be left outside the pot or gently placed within the new substrate. Do not force them, as they are delicate and may break.
- Dealing with bad roots: If the orchid has many bad roots, remove the damaged ones and disinfect the cuts with charcoal or a fungicide. This will help prevent infections and promote the growth of healthy roots.
4. Cleaning and treating roots
- Washing roots: If the orchid’s roots are tangled or covered in old substrate, gently wash them in lukewarm water. This will help in untangling them and make it easier to assess their condition.
- Soaking roots: Before repotting, you can soak the roots in a fungicide solution or disinfectant for 10-15 minutes. This helps prevent fungal infections, especially if there were rotten roots.
- Disinfecting cuts: Treat cut surfaces with a fungicide or activated charcoal. This is crucial to prevent infections after trimming rotten or damaged roots.

5. Potting the orchid
- Choosing the right pot: Orchids need pots with good drainage. Transparent plastic pots are often preferred as they allow you to monitor root health and moisture levels.
- Placing the orchid in the pot: Hold the orchid in place while adding fresh potting mix. Make sure the roots are well distributed, and fill the pot without compacting the substrate too tightly, as orchids need good air circulation around their roots.
- Aerial roots placement: If there are many aerial roots, they can either be placed inside the pot if they are flexible enough, or left outside. Do not force them, as they may break.
6. Aftercare: watering and monitoring
Watering after repotting: After repotting, it is essential to give the orchid time to adapt. Do not water immediately. Wait for about 5-7 days before the first watering to allow the cut surfaces to heal and prevent rot. Once you begin watering, use lukewarm, filtered water.
Humidity and ventilation: Orchids need a humid environment to thrive, especially after repotting. Use a humidity tray or humidifier to maintain an optimal level of 50-70%. Ensure the plant is in a well-ventilated area to prevent stagnant moisture, which can lead to root rot.
Light requirements: After repotting, keep the orchid in a place with bright, diffused light. Avoid direct sunlight, as the plant is in a sensitive state and could easily get stressed.
Common repotting issues and solutions
- Rotting roots after repotting: If roots start to rot after repotting, it is usually due to overwatering or poor ventilation. Reduce watering frequency and ensure the pot has sufficient drainage. Check that the substrate is not compacted and allows air circulation.
- Yellow roots: If you notice yellow roots during repotting, this could indicate stress or old age. Trim off any yellow or damaged parts and treat with a fungicide to avoid further issues.
- Handling broken roots: It is common for some roots to break during repotting. If this happens, trim the broken part and disinfect the cut to prevent infections.
Special cases: repotting orchids with no roots or Bad roots
Repotting orchids with no roots: If your orchid has lost all its roots, it is still possible to save it. Place the orchid in a high-humidity environment, such as a greenhouse or a plastic bag with holes for air circulation. Mist the plant regularly and avoid direct sunlight. The goal is to encourage the growth of new roots.
Repotting orchids with aerial roots only: In cases where the orchid only has aerial roots, these should be carefully placed into the potting medium or left exposed. Encourage new root growth by maintaining a humid environment and misting regularly.
Frequently asked questions about orchid roots during repotting
- Can You trim orchid roots when repotting? Yes, trimming orchid roots is often necessary to remove dead, rotten, or damaged roots. Always use a sterilized tool to avoid spreading disease.
- How to handle aerial roots during repotting? Aerial roots can be placed into the new pot if they are flexible or left exposed if they seem too rigid. They are natural and help the orchid absorb moisture from the air.
- Where should the roots go When repotting? Roots should be evenly distributed in the new pot. Healthy roots should be placed into the potting medium, while aerial roots can be left outside or gently included if possible.
- How to encourage root growth after repotting? Maintain high humidity and provide bright but indirect light. You can also use root growth stimulators or hormones to encourage faster development.
Conclusion
Repotting orchids may seem challenging, but it is an essential part of ensuring their health and longevity. By carefully handling the roots, providing the right substrate, and following proper aftercare practices, you can help your orchid thrive. Regular repotting not only refreshes the plant’s growing conditions but also gives you a chance to assess and address any health issues. Remember, a healthy root system is the key to a healthy orchid!
