Rotten orchid roots: what to do?
Last reviewed: 11.03.2025

When an orchid's roots have rotted, it is a serious problem that many growers face. Root rot can lead to the death of the plant, but with timely and proper actions, it is possible to save the orchid and restore its health. In this article, we will take a detailed look at what to do if your orchid's roots have rotted, how to identify the causes, and the steps to take to help the plant recover.
Why do orchid roots rot?
Before starting to save an orchid, it is important to understand why orchid roots rot. The most common causes of root rot include:
- Excessive watering. Orchids cannot tolerate stagnant water. Constant excess moisture in the pot can cause the roots to begin to rot. What to do if the orchid was overwatered? You should urgently inspect the plant and take the necessary steps to save it.
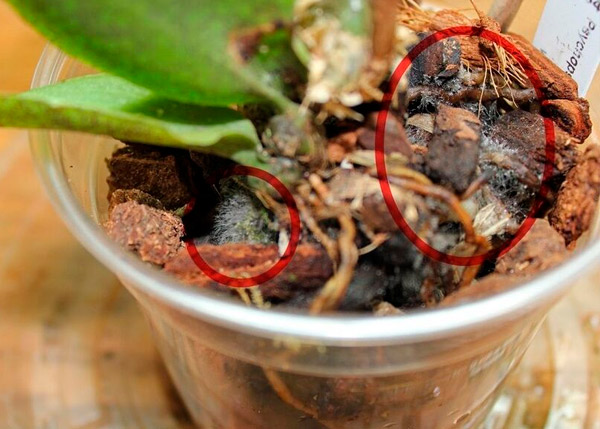
- Improper substrate. Using an unsuitable or too dense substrate that does not allow air circulation can lead to root rot. Orchid roots need good aeration, and a dense substrate prevents this.
- Lack of light. Light plays an important role in the process of photosynthesis, which is necessary for healthy roots. If the orchid does not get enough light, it cannot properly absorb moisture, which also contributes to root rot.
- High humidity and lack of ventilation. If the room where the orchid is kept is too humid and lacks ventilation, the roots may rot. It is important to maintain the right balance of humidity and fresh air.

Steps to save an orchid with rotten roots
If you notice that your orchid's roots have rotted, it is important to act quickly to save the plant. Here is a step-by-step guide to restoring an orchid with rotten roots.
Step 1: inspect and remove rotten roots
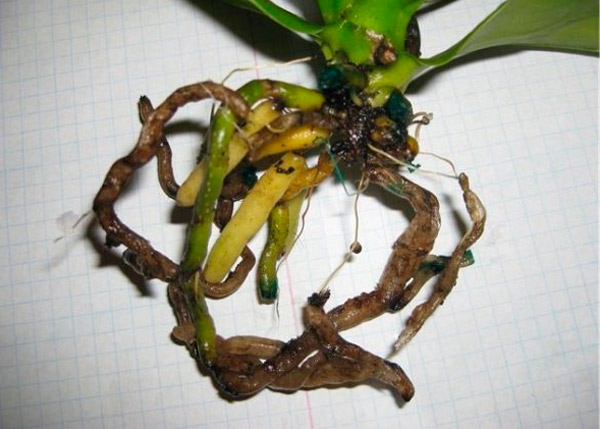
The first thing to do is to carefully remove the orchid from the pot and inspect the roots. Healthy roots are light green or white in color and have a firm texture. Rotten orchid roots will be dark, soft, and slimy. These roots must be removed to prevent the spread of rot.
Use sterilized scissors or pruning shears to carefully cut away all rotten parts. Be sure to treat the cuts with an antiseptic, such as crushed activated charcoal or cinnamon, to prevent infection.
Step 2: drying and treatment
After removing all the damaged roots, the orchid needs to be dried. Leave the plant in the air for a few hours to allow the cuts to dry. This will help prevent further rot.
For additional protection, the remaining roots can be treated with a fungicide to prevent fungal infections. This is especially important if the orchid has already suffered from overwatering.
Step 3: repotting in new substrate
Once the roots have dried, the orchid should be repotted in a new substrate. Use a special orchid substrate consisting of bark, moss, and other materials that provide good aeration and drainage. Do not use the old substrate, as it may contain spores of fungi and bacteria.
Choose a pot with good drainage holes to prevent water from stagnating. Repot the orchid so that the roots are free in the substrate and not too tightly packed.
Step 4: proper watering after repotting
After repotting, do not water the orchid heavily right away. It is best to leave the plant without watering for a few days to allow it to adapt. The first watering should be light and gentle, preferably by misting the substrate to avoid over-saturating it with moisture.
In the future, watering should be moderate. Make sure the substrate dries out between waterings to avoid reoccurrence of root rot. The optimal method is to submerge the pot in water for 10-15 minutes, then allow the water to drain completely.
Step 5: creating optimal conditions for recovery
To successfully recover the orchid, it is important to create optimal conditions for it:
- Light: provide the orchid with bright but diffused light. Direct sunlight can burn the leaves, so it is best to place the plant on an east or west-facing window.
- Humidity: maintain a high level of humidity, but ensure there is good ventilation in the room. You can use a humidifier or place a tray with water and pebbles near the plant.
- Temperature: the optimal temperature for orchid recovery is +20-25 °c. Avoid sudden temperature changes and drafts.

Tips for preventing orchid root rot in the future
Root rot is one of the most common issues when growing orchids. To avoid it, it's essential to maintain proper care and follow specific preventative measures.
Proper watering routine
- Avoid overwatering: only water the orchid once the substrate is completely dry. Transparent pots help visually monitor moisture levels.
- Watering method: use the soaking method: immerse the pot in lukewarm water for 15–20 minutes, then allow all excess water to drain completely.
- Water quality: use soft, filtered, or settled water at room temperature. Hard water with high salt content can damage roots.
Choosing the right substrate
- Substrate composition: select a substrate made from pine bark, coconut chips, or sphagnum moss. It should be lightweight, well-draining, and allow for air circulation.
- Regular replacement: refresh the substrate every 1–2 years, as it decomposes and compacts over time, reducing airflow.
Using the right pot
- Transparent pot: transparent pots allow you to monitor root health and moisture levels.
- Drainage holes: the pot should have sufficient drainage holes to remove excess water effectively.
- Pot size: ensure the pot is appropriately sized for the root system. An oversized pot can retain excess moisture.
Maintaining optimal humidity
- Humidity level: keep the air humidity between 50–70%.
- Use a humidifier: during the heating season, add a humidifier or place a tray of water with pebbles near the plant.
Ensuring adequate ventilation
- Airflow: position the orchid in a well-ventilated area to prevent stagnant air around the roots.
- Perforated pots: pots with side holes enhance air circulation within the substrate.
Regular root inspections
- Visual checks: periodically inspect the roots for changes in color, structure, or signs of rot.
- Healthy indicators: healthy roots are light green (when moist) or silvery (when dry). Any dark, soft, or slimy areas need attention.
Fertilizer management
- Concentration: use orchid-specific fertilizers at half the recommended strength.
- Frequency: feed the orchid no more than once every 2–3 weeks during active growth periods.
- Avoid salt buildup: flush the substrate with clean water every 4–6 weeks to remove excess salts.
Temperature and light control
- Temperature: maintain temperatures between 68–77°f (20–25°c). Avoid sudden temperature changes and cold drafts.
- Lighting: provide bright, indirect light. A lack of light slows root growth, making the plant more susceptible to rot.
Using fungicides (if necessary)
- Preventive treatment: if the orchid has previously experienced root rot, treat the roots with a fungicide during repotting.
- Regular prevention: use a mild fungicide solution every 2–3 months, especially in high-humidity conditions.
Minimizing stress factors
- Avoid frequent relocation: changing the plant’s location too often can cause stress and weaken it.
- Balanced care: strive to maintain a consistent balance of watering, light, humidity, and temperature.
Proper repotting practices
- Repot when needed: repot the orchid if roots begin to rot, the substrate decomposes, or the roots outgrow the pot.
- Sterile tools: use clean scissors to trim rotted roots.
- Treat cuts: apply activated charcoal or cinnamon to cut areas to prevent infection.
Conclusion
Rotten orchid roots: what to do? The main thing is not to panic and act quickly and decisively. Removing rotten roots, treating the cuts, proper repotting, and creating optimal conditions will help the plant recover. Orchids are tropical plants that require attention and care, but with proper care, they can delight you with their beautiful flowers for many years. Follow these recommendations, and your orchid will bloom again and be healthy.
